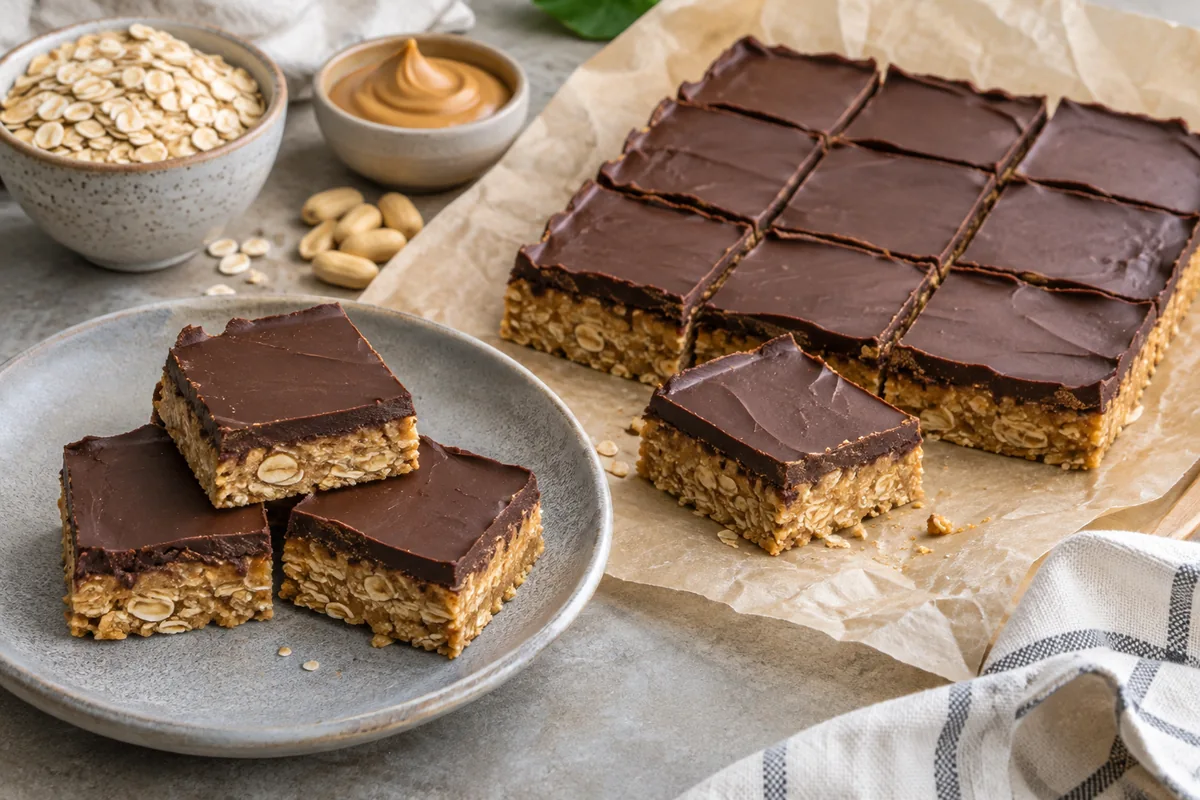
A good no-bake oat bar should hold together when lifted without turning into a hard candy square. These bars use smooth peanut butter and gently warmed honey to bind small oat flakes, then finish with chocolate softened by a little more peanut butter. The contrast is simple: a substantial, chewy base beneath a thin topping that yields to a knife.
There is no oven step, but this is not an instant dessert. The base needs refrigerator time to firm, and the chocolate should set before cutting. Plan around that pause and the hands-on work stays short, with no need to shape individual portions or manage several baking sheets.
Timing, Pan, and Portions
The total includes 120 minutes of refrigeration. Cooking time covers approximately three minutes on the stovetop and two minutes of microwave heating; preparation includes lining, measuring, pressing, spreading, and cutting. A refrigerator that is crowded or frequently opened may require a longer setting period.
Gather an 8-by-8-inch metal pan, parchment, a 2-quart saucepan, a flexible spatula, a dry microwave-safe bowl, and a sharp chef's knife. A straight-sided pan makes even squares easier. A 9-inch square pan will produce thinner bars, while a loaf pan makes a deeper slab that chills and cuts differently.
Ingredients
- 1 cup plus 2 tablespoons (288 g) smooth no-stir peanut butter, divided
- 1/2 cup (170 g) honey
- 1/4 cup (57 g) unsalted butter, cut into pieces
- 1/4 teaspoon fine salt
- 2 teaspoons vanilla extract
- 3 cups (270 g) quick oats labeled suitable for no-cook use
- 1 1/3 cups (225 g) semisweet chocolate chips
The Oat Choice Determines the Bite
Quick oats are rolled into smaller, thinner pieces than old-fashioned oats. They mingle with the binder instead of creating long flakes that separate as the slab is cut. Choose a product whose package permits no-cook preparations. This brief warming step is not a substitute for a required cooking procedure printed on an oat package.
Instant oatmeal packets are not interchangeable with plain quick oats. They can contain sugar, salt, flavorings, and very finely processed cereal that changes both sweetness and absorption. Steel-cut oats are also unsuitable: their hard, coarse pieces will not become pleasantly tender in this formula without cooking and additional liquid.
No-stir peanut butter makes the set more predictable because its fat and solids stay evenly dispersed. Stirred natural peanut butter varies widely from jar to jar and becomes particularly troublesome when oil has collected at the top. A layer that looks oily after pressing usually begins with an unsuitable or poorly mixed nut butter.
Make the Bars
- Line an 8-by-8-inch metal baking pan with two crossing strips of parchment, leaving an overhang on all four sides. Measure out 1 cup (256 g) peanut butter for the base and reserve the remaining 2 tablespoons (32 g) for the topping.
- Combine the 1 cup peanut butter, honey, butter, and salt in a 2-quart saucepan. Warm over low heat for about 3 minutes, stirring constantly, until the butter melts and the mixture is smooth. Do not bring it to a boil. Remove from the heat and stir in the vanilla.
- Stir in all the quick oats until evenly coated, scraping the bottom of the pan. Transfer to the lined pan and press into a level, compact layer with a spatula or the flat bottom of a measuring cup over a small piece of parchment.
- Combine the chocolate chips and reserved 2 tablespoons peanut butter in a dry microwave-safe bowl. Microwave at 50 percent power in 30-second intervals, stirring after each, until almost melted, about 2 minutes of heating in total. Stir until completely smooth.
- Spread the chocolate mixture over the oat base, reaching every corner. Refrigerate the pan uncovered for 2 hours, until the chocolate is set and the center of the oat layer feels firm when gently pressed. Cover if chilling longer.
- Lift the slab onto a cutting board using the parchment. Cut into 16 squares with a sharp knife, wiping the blade between cuts. If the chocolate cracks, let the slab stand for 5 minutes before continuing. Keep the bars refrigerated until serving.
Warm the Binder Without Making Candy
The saucepan is there to melt butter and loosen the peanut butter, not to boil the honey into a syrup. Low heat and constant stirring keep the mixture smooth. Once the butter disappears, take the pan off the burner. A rolling boil evaporates water and can make the finished base harder and more brittle.
Add the vanilla off the heat so its aroma is not driven off unnecessarily. Then stir in the oats promptly, working around the sides and bottom of the saucepan. Dry pockets are easiest to correct before the mixture enters the baking pan; afterward they become loose, crumbly corners that the chocolate cannot repair.
Use firm, even pressure when packing the base, especially along the perimeter. Pressing over a small parchment square prevents the measuring cup from sticking and pulling the mixture back up. Aim for a level surface, not a heavily polished one. A low corner collects extra chocolate and leaves the opposite corner with a nearly bare top.
Keep the Chocolate Smooth and Sliceable
A completely dry bowl and spatula are important for the topping. Water can make melted chocolate seize into a thick, grainy paste. Short microwave intervals reduce the chance of scorching, and stirring between intervals spreads the heat through chips that may still look intact even when they have softened inside.
Stop heating when only a few small pieces remain and let stirring finish the job. The reserved peanut butter softens the set enough to reduce shattering without turning the top into frosting. Spread it with the back of a spoon or an offset spatula, keeping the tool nearly parallel to the surface.
If the surface has set but the base slumps when lifted, return the entire slab to the refrigerator. Cutting early cannot be fixed by pressing the individual pieces afterward. If the chocolate breaks into sharp fragments, a few minutes at room temperature usually gives it enough flexibility for cleaner cuts without warming the whole base excessively.
Adjustments With Predictable Results
For a darker finish, use the same weight of bittersweet chocolate chips. The bar will taste less sweet even though the honey in the base stays unchanged. Milk chocolate makes a sweeter, softer topping and should remain chilled right up to serving. White baking chips melt differently and are not the first choice for this formula.
A thick, smooth sunflower-seed butter can replace the peanut butter in both places for a peanut-free variation, but check all packaging for the allergens relevant to your kitchen. Some seed butters are runny, and those may not set as firmly. Do not describe the result as allergy-safe without verifying the oats, chocolate, and processing labels too.
Maple syrup is thinner than honey and does not behave identically in this uncooked base. Keep honey for the most reliable texture rather than making a one-for-one swap and hoping the refrigerator compensates. For gluten-free bars, use certified gluten-free oats and verify the other packaged ingredients; ordinary oats may have cross-contact with wheat.
Serving, Planning, and Storage
Cut the slab into four rows in each direction for sixteen substantial squares, or cut each square diagonally for smaller bites. Set pieces in a single layer on a cool platter instead of stacking them in a warm room. The chocolate is a topping, not a heatproof shell, and fingerprints show quickly as it softens.
For a chilled dessert spread, pair the bars with strawberry shortcake cheesecake dip and fresh berries; the fruit provides a lighter contrast to peanut butter. When an autumn dessert table needs both chocolate and fruit, salted caramel apple cheesecake bars offer a separate creamy option without changing this recipe's base.
Make the bars a day ahead and refrigerate them in the pan after the topping sets. Cut before packing so guests do not need to handle a whole slab. Place parchment between layers in an airtight container and refrigerate for up to four days. Keep them away from strong-smelling foods because chocolate readily picks up refrigerator odors.
For longer storage, freeze the cut bars in a single layer until firm, then pack with parchment between layers for up to two months for best quality. Thaw overnight in the refrigerator, still covered. Opening a frozen container in a humid room can leave condensation on the chocolate, giving it a dull or sticky surface.
These bars contain no eggs or raw flour, but that does not make every dessert beside them shelf-stable. Keep any perishable accompaniments chilled and return them to refrigeration within two hours, or one hour when the temperature exceeds 90 F. Transport the bars cold in an insulated bag to protect their shape as well as the presentation.