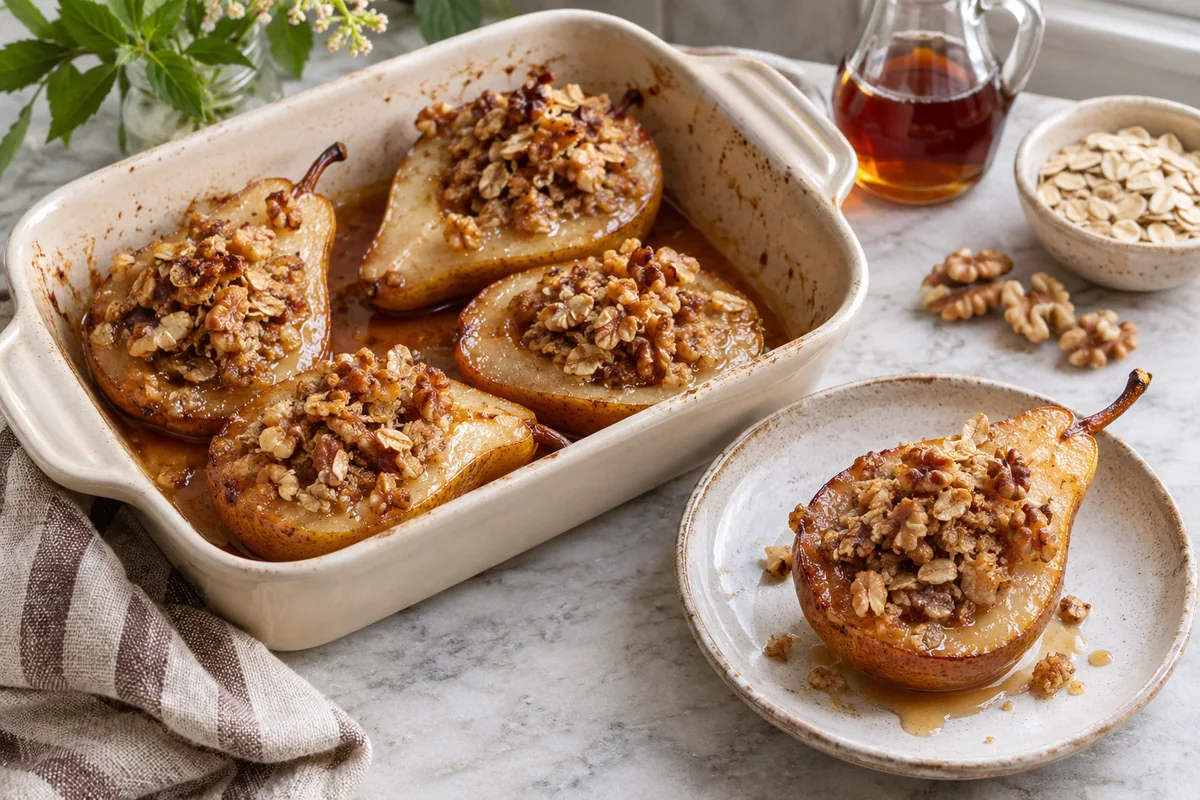
Baking pears in halves preserves their shape and gives every serving its own small cap of oat and walnut crisp. Maple syrup gathers with the pear juices beneath the fruit, while the topping stays above the liquid where it can brown. It is a fruit-forward dessert rather than a bowl of crumble with a few pieces of pear underneath.
The method uses two stages: a covered head start for the pears, followed by an uncovered bake with the topping. That separation is useful because raw firm fruit and small pieces of walnut do not cook at the same speed. Giving the pears fifteen minutes alone reduces the chance of a toasted topping sitting on an unyielding center.
Timing and Baking Dish
The total includes a 10-minute rest after baking. Use a 375 F oven and a 9-by-13-inch baking dish that holds eight pear halves in a single layer. Thirty-five minutes is the expected baking time for medium firm-ripe fruit; especially firm pears may need another five to ten minutes.
A melon baller makes neat hollows, but a small teaspoon works if you scoop carefully. You will also need a paring knife, foil, a pastry brush or spoon, and a medium bowl. A ceramic or glass baking dish holds the syrup well; avoid a very wide metal sheet where the small amount of liquid can evaporate too quickly.
Measured Ingredients
- 4 medium firm-ripe Bosc or Anjou pears, about 1 1/2 pounds (680 g) total
- 1 tablespoon fresh lemon juice
- 3 tablespoons pure maple syrup, divided
- 3/4 teaspoon ground cinnamon, divided
- 1/4 cup (60 ml) water
- 1/2 cup (45 g) old-fashioned rolled oats
- 1/4 cup (30 g) all-purpose flour
- 1/3 cup (40 g) walnuts, chopped into small pieces
- 2 tablespoons (25 g) packed light brown sugar
- 1/4 teaspoon fine salt
- 3 tablespoons (42 g) unsalted butter, melted and cooled slightly
Pick Pears That Yield Without Collapsing
Bosc pears have a dense texture that holds together nicely during baking. Anjou pears also work, provided they are not rock-hard. Choose fruit that gives slightly near the stem but remains firm through the body. A pear that dents easily under a finger may slump before the topping has finished browning.
Try to buy pears of similar size and ripeness. If one is much larger than the others, its thickest section can lag behind while the smaller halves soften. Weight is a more useful guide than the word medium alone: four pears totaling about one and a half pounds fit this dish and timing well.
The small slice taken from the rounded underside is only a stabilizer. Remove just enough to create a resting point, not enough to expose a broad patch of flesh underneath. Deeply trimming the base lets syrup penetrate from both sides and can make a ripe pear break when lifted onto a plate.
Bake the Pears
- Heat the oven to 375 F with a rack in the center. Have ready a 9-by-13-inch baking dish, aluminum foil, a melon baller or teaspoon, and a medium mixing bowl.
- Wash and dry the pears, then halve them lengthwise. Scoop out the seed cores and remove the tough string running toward the stem. Cut a very thin slice from each rounded underside if needed so the halves sit flat, leaving the skins on.
- Arrange the pears cut-side up in the baking dish. Brush the cut surfaces with the lemon juice and 1 tablespoon maple syrup, then sprinkle with 1/4 teaspoon cinnamon. Pour the water into the bottom of the dish around the pears. Cover tightly with foil and bake for 15 minutes.
- While the pears bake, stir together the oats, flour, walnuts, brown sugar, salt, and remaining 1/2 teaspoon cinnamon. Add the melted butter and remaining 2 tablespoons maple syrup. Stir until all the dry ingredients are moistened and small clumps form.
- Remove the foil carefully, keeping your hands clear of the steam. Divide all the topping among the eight pear halves, pressing it lightly into the hollows and across the cut surfaces.
- Bake uncovered for about 20 minutes more, until the topping is golden and a small knife slides easily into the thickest part of a pear. Start checking after 15 minutes; firmer pears may need an additional 5 to 10 minutes. If the topping browns first, tent loosely with foil.
- Let the pears rest for 10 minutes. Spoon the pan juices around, not over, the crisp topping and serve two halves per portion.
Build Crisp Clusters Instead of a Paste
Old-fashioned oats keep recognizable flakes after baking, giving the topping more texture than instant oatmeal. Flour absorbs some of the butter and maple syrup and helps form small clusters. Stir just until evenly moistened. If you work the mixture until it becomes a smooth ball, it will bake into a dense lid rather than scattered crisp crumbs.
Chop the walnuts into small, uneven pieces, roughly a quarter inch across. Large pieces stick out and can scorch, while finely ground nuts blend into the flour and lose their distinct crunch. The brown sugar encourages browning; the maple syrup supplies flavor and helps the crumbs adhere to the curved pear surfaces.
Melted butter is convenient here because it coats the oats immediately. Let it cool enough that it is warm rather than sizzling before mixing. The topping will feel moist but should still break apart when pinched. Divide it evenly instead of piling most of it into the core hollows, where a very deep mound can remain soft.
Use Steam First, Then Let Moisture Escape
The water belongs around the pears, not in the topping. During the covered stage it creates a humid environment that softens the fruit without requiring a large pool of syrup. A tight foil seal matters during this first phase. Lift the foil away from your face when opening the hot dish.
For the second stage, leave the dish uncovered so moisture can escape and the topping can toast. Check the pear flesh with a knife beside the topping, near the thickest curve. It should offer little resistance but still hold its shape. Softness at the narrow stem end alone does not mean the whole half is ready.
If the dish looks dry before the pears are tender, add a tablespoon or two of hot water around the edges as a corrective measure. If the walnuts are already golden, use a loose foil tent rather than resealing the dish tightly. A tight cover at this point would trap steam against the topping and soften it.
Ways to Adapt the Flavor
Pecans can replace the walnuts by weight for a slightly sweeter, less tannic topping. For a nut-free variation, replace the walnuts with an additional one-third cup of rolled oats; expect a more cereal-like crunch rather than a nutty snap. Check ingredient packaging whenever an allergy is the reason for the change.
To make the topping without wheat, use a cup-for-cup gluten-free baking flour in place of the all-purpose flour and certified gluten-free oats. Because blends absorb liquid differently, look for the same loose, moistened clumps before topping the pears. An oat-flour-only swap tends to make a softer, less distinct crumble.
Keep pure maple syrup for its recognizable flavor. Pancake syrup is a different product and can be much sweeter or thicker. Honey can brown more aggressively and tastes different, so it is not an invisible substitution. If your pears are already very sweet, serve smaller portions rather than removing the liquid that helps bind the topping.
Serve the Syrup Beside the Crunch
Resting the dish lets the fruit cool to a comfortable eating temperature and gives the pan juices a little time to thicken. Use a wide spoon or small spatula under each half to keep the skin intact. Spoon the liquid around the pear instead of over its crisp cap, which would undo the uncovered baking stage.
For another warm-fruit dessert with a different topping, brown butter peach cobbler with cinnamon biscuit topping offers a softer biscuit contrast to these oats. If dessert needs to be portioned before guests arrive, salted caramel apple cheesecake bars provide a chilled alternative while the pears stay the warm option.
Make Ahead Without Losing the Topping
Mix the dry topping ingredients up to a day ahead and keep them covered; add butter and maple syrup shortly before baking. Pears are best cut near baking time because exposed flesh browns. If needed, core them a few hours ahead, brush with the measured lemon juice, cover, and refrigerate; use the remaining measured ingredients as directed.
Refrigerate leftover pears in a shallow covered container within two hours, or one hour above 90 F, and use within three to four days. For reheating, warm in a 350 F oven until the center reaches 165 F; consult the FoodSafety.gov temperature chart. The oven restores more topping texture than a microwave.
A microwave is convenient for a single portion, but the steam will soften the oats. Freezing is possible, although thawed pears can release extra liquid and the topping loses much of its crispness. For the best distinction between tender fruit and crunchy crumbs, prepare only the number of portions you expect to enjoy within a few days.