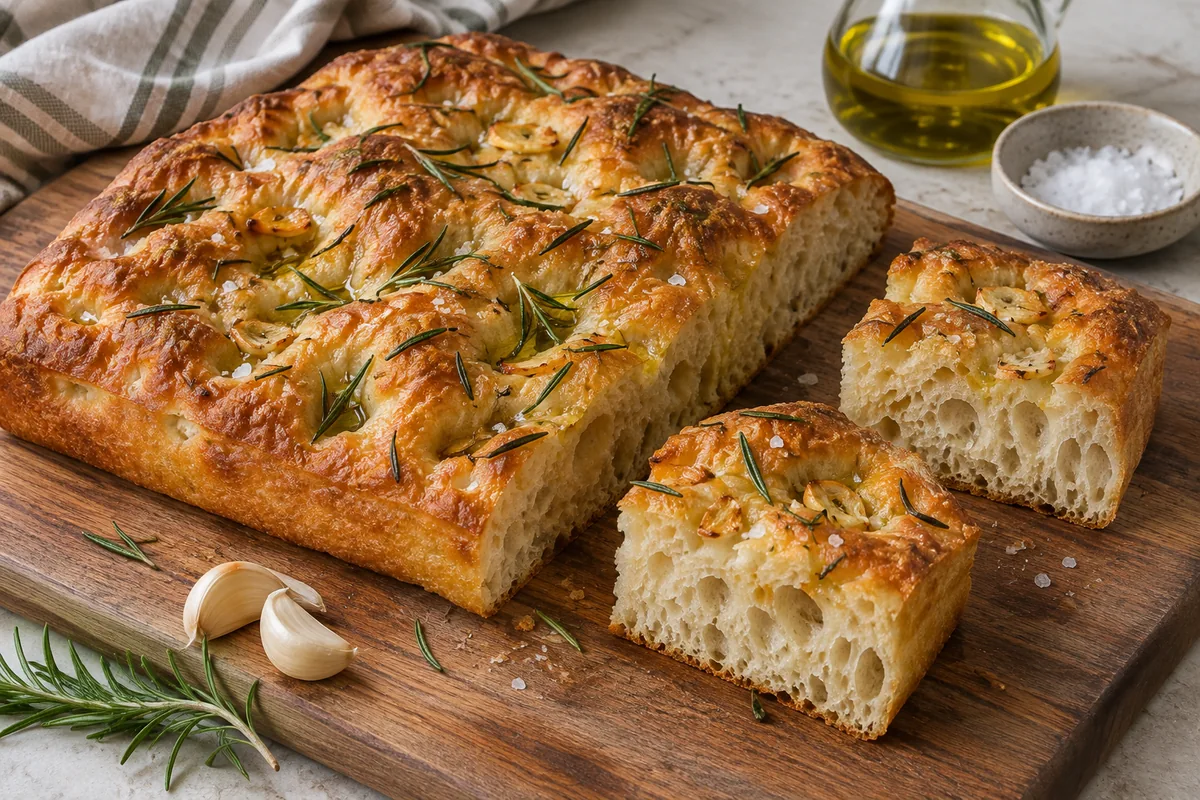
Garlic rosemary focaccia should have an open, tender interior beneath a golden surface, with olive oil crisping the bottom and collecting in a few dimples. Its character comes from wet dough and patient fermentation rather than intensive kneading. This same-day version uses a short set of folds, a roomy first rise, and a final proof in the baking pan.
The garlic goes on late in the bake, mixed with rosemary, oil, and a little water. That timing lets the bread establish its crust without exposing small garlic pieces to the full baking period. The result is savory and aromatic, with toasted garlic rather than bitter black flecks. Serve broad squares alongside dinner or split cooled pieces horizontally for sturdy, flavorful sandwiches.
Time, yield, and the right pan
The 3-hour-45-minute total includes 90 minutes of first-rise resting, 60 minutes of pan proofing, and 20 minutes of cooling. Times assume a kitchen near 75 F; dough readiness takes priority. Use a 9-by-13-inch metal baking pan at least 2 inches deep, a large bowl, a kitchen scale, a sturdy spoon, and a wire rack. Bake at 425 F in a conventional oven.
Ingredients
- 500 g bread flour (about 4 cups, spooned and leveled)
- 7 g instant yeast (2 1/4 teaspoons)
- 5 g granulated sugar (1 teaspoon)
- 10 g fine salt (about 1 3/4 teaspoons)
- 400 g lukewarm water (400 ml), about 90 to 100 F
- 4 tablespoons extra-virgin olive oil (60 ml), divided
- 4 medium garlic cloves, finely chopped (about 12 g)
- 1 tablespoon finely chopped fresh rosemary leaves
- 1 tablespoon water, for the topping
- 1/2 teaspoon flaky sea salt
Understand the wet dough before reaching for flour
The water weighs 80 percent of the flour weight, making this a high-hydration dough. Immediately after mixing it will look sticky, shaggy, and too loose to knead conventionally. That is expected. Adding enough flour to make it feel like sandwich-bread dough produces a tighter crumb and makes the focaccia less supple.
Rest gives the flour time to absorb water. Folding then organizes the developing gluten without forcing you to handle the dough continuously. After the folds, it should stretch into a thick sheet before tearing, although it will still cling to dry fingers. Lightly wet hands are more useful than a floured countertop. Bread flour provides strength; measuring it by weight avoids the large variation caused by scooping packed cups.
A defined same-day schedule
For an illustrative 9:00 a.m. start, mix from 9:00 to 9:10, rest until 9:30, and fold from 9:30 to 9:35. Continue the first rise until approximately 10:45. Pan and gently stretch the dough from 10:45 to 10:50, then proof until about 11:50. Dimple and salt from 11:50 to 11:55, bake until about 12:25, and cool until 12:45.
The first-rise rest totals 90 minutes: 20 minutes before folding and about 70 afterward. Prepare the garlic mixture and preheat the oven during the final proof; they do not add another block of waiting time. If the room is cool, shift every later stage rather than shortening the second rise to preserve an arbitrary serving time.
Mix, proof, and bake
- In a large bowl, stir together the bread flour, instant yeast, sugar, and fine salt. Add the 400 g lukewarm water and 1 tablespoon olive oil. Stir thoroughly until no dry flour remains, allowing about 10 minutes for measuring and mixing. Cover and rest for 20 minutes.
- With lightly wet hands, lift one edge of the dough and fold it over the center. Rotate the bowl and repeat on the other three sides. Repeat this four-fold sequence once more, working gently over about 5 minutes. Cover again.
- Let rise for about 70 minutes more in a spot near 75 F, until roughly doubled, visibly bubbly, and elastic. Allow longer if it remains dense or shows little expansion; the first-rise resting time is about 90 minutes excluding the folding.
- Pour 2 tablespoons olive oil into a 9-by-13-inch metal pan and coat the bottom and sides. Transfer the dough to the pan, turn gently to coat both sides with oil, and ease it toward the corners over about 5 minutes. Do not force it if it resists.
- Cover without touching the dough and proof for about 60 minutes, until puffy, jiggly, and nearly filling the pan. After the first 20 minutes, gently stretch any short edges toward the corners if needed. During the final 30 minutes, heat the oven to 425 F with a rack in the lower-middle position.
- During proofing, combine the garlic, rosemary, remaining 1 tablespoon olive oil, and 1 tablespoon topping water in a small bowl. When the dough is ready, use fingers coated with oil from the pan to press deep dimples almost to the bottom without tearing it. Sprinkle with the flaky sea salt; allow about 5 minutes for dimpling and finishing.
- Bake for 20 minutes. Carefully pull the oven rack forward, spoon the garlic-rosemary mixture evenly over the surface, and return the pan to the oven. Bake about 10 minutes more, until deeply golden with a crisp underside and a center temperature of 205 to 210 F. If the garlic darkens too quickly, loosely shield the top with foil.
- Let stand in the pan for 5 minutes, then loosen the edges and transfer to a wire rack for another 15 minutes. Cut into 12 squares after this 20-minute cooling period.
Read fermentation in the bowl and the pan
At the end of the first rise, bubbles should be visible around the sides of the bowl and the dough should have gained substantial volume. A bowl with fairly straight sides makes expansion easier to judge. A cold, compact mass that has barely moved is not ready just because the timer has sounded. Give it more time in a comfortably warm location, not directly against a heater.
During the pan proof, the dough relaxes toward the corners and develops a soft, inflated appearance. A gentle shake makes the surface quiver. A lightly oiled fingertip leaves an indentation that fills slowly rather than snapping back at once. If the dough retracts strongly when stretched, cover it and wait; repeated tugging deflates it and makes thin spots.
Dimples, garlic, and a crisp bottom
Dimpling redistributes larger gas pockets while making small wells for seasoning. Press confidently with spread fingers but stop short of ripping through the sheet. Excessively timid dimples disappear; violent poking squeezes out too much gas. The dough should remain visibly puffy after you finish, not look like a flat, oily pancake.
The oil beneath the dough is part of the crust, not simply a release agent. Metal conducts heat well enough to brown that underside within the stated bake. A glass dish behaves differently and is not the preferred swap. Remove the bread from its pan after five minutes so steam does not collect underneath and soften the freshly crisped base.
Troubleshoot dense crumb and pale crust
A dense crumb usually reflects underproofing, excess flour, or vigorous handling late in the process. Check the dough's expansion rather than automatically increasing yeast. If the loaf has large bubbles only at the top and a heavy bottom layer, it may have entered the oven before the interior was sufficiently aerated. Let the next batch become fully jiggly in the pan.
A pale base can come from a heavy insulated pan or insufficient preheating. Use the lower-middle oven position and allow the oven to heat fully. If the top is golden but the base is still soft, loosely shield the top and continue briefly. The 205 to 210 F bread temperature is a crumb-doneness cue, not a general food-safety minimum for other dishes.
Ingredient changes and an overnight option
All-purpose flour can replace bread flour by weight, but hold back 20 g of the mixing water initially because weaker flour may feel looser. Add it only if the dough seems stiff after its first rest. The result can be slightly less chewy. Use 1 teaspoon dried rosemary instead of fresh if necessary, and keep the late topping step to protect the chopped garlic.
For an overnight version, refrigerate the covered dough immediately after folding for 12 to 18 hours instead of completing the room-temperature first rise. Use a bowl with ample headroom. The next day, pan the cold dough and allow roughly 2 to 3 hours to warm, spread, and become puffy before dimpling. This schedule replaces the same-day timing and is not included in the 225-minute total.
Storage and ways to serve
Because this loaf has a moist fresh-garlic topping, refrigerate leftovers within 2 hours, or 1 hour above 90 F. Keep at 40 F or below for 3 to 4 days, following general limits in the FoodSafety.gov storage chart. Freeze wrapped squares for up to 2 months for quality. Reheat refrigerated pieces at 350 F until their centers reach 165 F, the recommended leftover endpoint.
Serve squares beside creamy Tuscan white bean soup, where the crisp base makes a useful contrast to the broth. If you enjoy garlic-forward breads with toppings, roasted garlic white pizza with spinach offers a different approach. Keep this focaccia simply dressed so its airy crumb and rosemary remain easy to appreciate.