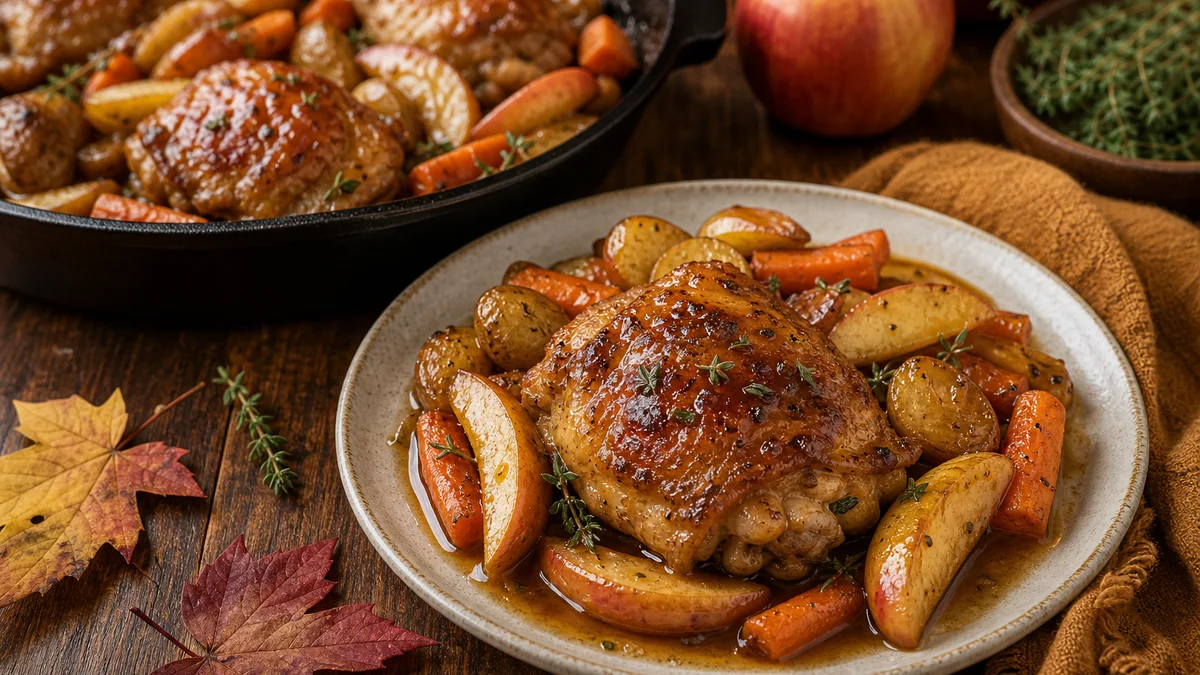
Apple cider glazed chicken thighs are cozy, savory, and just sweet enough.
The cider reduces into a glossy sauce with garlic, mustard, thyme, and a little butter.
Recipe Snapshot
Why This Recipe Works
Chicken thighs stay juicy while the cider glaze thickens around them. Mustard and vinegar keep the sauce from tasting too sweet.
The best version has one strong main flavor, one fresh finish, and a texture contrast that keeps the plate interesting.
Apples and thyme make it feel autumnal without turning dinner into dessert.
Before You Start
Apple Cider Glazed Chicken Thighs is much easier when the prep is handled before the pan, oven, skillet, or mixing bowl gets busy. Set out the main ingredients, measure the seasonings, and have your serving pieces ready. That little bit of order helps the recipe feel calm instead of rushed.
Pay attention to the ingredient that controls the timing. For this recipe, that is usually the 6 bone-in chicken thighs. Once that part is cooked, browned, tender, chilled, or set properly, the rest of the dish comes together with fewer surprises.
Dinner recipes move best when the slower ingredient starts first and quick-cooking ingredients wait until the end.
Flavor Roadmap
The main flavor path for Apple Cider Glazed Chicken Thighs starts with 6 bone-in chicken thighs, 1 tablespoon olive oil, 1 teaspoon salt, 1/2 teaspoon pepper, 1 cup apple cider. Those ingredients give the recipe its base, but the finished dish depends on how they are handled. Browning, simmering, baking, chilling, toasting, or tossing at the right moment changes the final result more than adding extra ingredients just for the sake of it.
Think of the seasoning in layers. The first layer seasons the main ingredient, the second layer builds the sauce or filling, and the final layer comes from garnish, acid, herbs, cheese, glaze, or crunch. This is why tasting near the end matters. A recipe can have all the right ingredients and still need one small adjustment before it feels finished.
If the finished flavor seems flat, add brightness before adding more richness. A little lemon, vinegar, herbs, scallions, pickles, fresh fruit, or crunchy vegetables can do more than another handful of cheese or another spoonful of sauce. If it tastes sharp, balance it with a small amount of fat, sweetness, starch, or dairy.
Ingredients
Sear the chicken first so the skin gets color before the glaze reduces.
- 6 bone-in chicken thighs
- 1 tablespoon olive oil
- 1 teaspoon salt
- 1/2 teaspoon pepper
- 1 cup apple cider
- 1 tablespoon Dijon mustard
- 1 tablespoon apple cider vinegar
- 2 cloves garlic
- 1 teaspoon thyme
- 2 tablespoons butter
- Apple slices
Ingredient Prep Checklist
Before cooking, check the size and shape of the main ingredients. Pieces that are similar in size cook more evenly, which keeps the recipe from having some bites overdone and others undercooked. This matters most with meat, seafood, potatoes, pasta, vegetables, and baked fillings.
Keep wet and crisp components separate until the recipe calls for combining them. Sauces, dressings, fruit, juicy vegetables, and creamy fillings can soften breading, tortillas, crust, lettuce, pasta, or toppings if they sit together too long. That separation is one of the easiest ways to protect texture.
Use the ingredient list as a guide, but let common sense win when your ingredients are larger, smaller, sweeter, saltier, or more watery than expected. Recipes work best when you watch what is happening in front of you rather than following the clock blindly.
How to Make Apple Cider Glazed Chicken Thighs
Follow the order of the steps so the texture stays controlled and the final dish lands hot.
- Season chicken with salt and pepper.
- Sear skin-side down until golden.
- Flip and cook 4 minutes.
- Whisk cider, mustard, vinegar, garlic, and thyme.
- Pour sauce into skillet.
- Simmer until chicken reaches 165 degrees F.
- Stir in butter.
- Serve with reduced glaze and apple slices.
How to Know It Is Done
Look for the main ingredient to be cooked through, the sauce to cling instead of puddle, and the garnish to add freshness at the end. The final dish should taste complete before it reaches the plate.
Use visual cues first, then confirm with temperature, texture, or resting time where it matters. Chicken, turkey, reheated leftovers, and many mixed dishes should be checked carefully. Breads, casseroles, desserts, and saucy dishes often need a few minutes of patience after cooking because carryover heat and resting time improve the final texture.
When in doubt, pause and inspect the thickest part, the center of the dish, or the piece that looks least cooked. That small check prevents the two most common problems: pulling food too early because the top looks done, or leaving it too long because you were waiting for a timer instead of reading the food.
Recipe Tips
Start skin-side down
That gives the best browning.
Reduce the glaze
Thin sauce will slide off the chicken.
Use a thermometer
Thigh size changes cook time.
Easy Variations
You can make the glaze sweeter, sharper, or more herbal.
- Add rosemary instead of thyme.
- Use maple syrup for extra gloss.
- Add onions to the skillet.
- Use boneless thighs for faster cooking.
Common Mistakes to Avoid
The most common dinner mistake is turning the heat too high to save time. It usually burns the outside before the center or sauce is right.
Another mistake is skipping the final taste or texture check. A squeeze of lemon, a pinch of salt, a handful of herbs, a little extra sauce, or a few extra minutes in the oven can make the recipe feel finished instead of merely cooked.
Do not let the garnish be an afterthought. The right garnish adds freshness, color, crunch, or contrast. It also helps the finished plate look intentional, which matters when a recipe is simple.
Small Details That Help
Use a clean plate, bowl, board, or platter for serving instead of carrying the cooking pan straight to the table every time. That small step makes Apple Cider Glazed Chicken Thighs look better and gives you a chance to add garnish, sauce, or a final sprinkle evenly.
If the dish feels heavy, serve a smaller portion with something fresh beside it. If it feels light, add a starch, bread, salad with protein, or an easy side so the meal feels complete.
Make-Ahead Notes
Whisk the glaze ingredients ahead and refrigerate.
If you are cooking for company, do the chopping, measuring, mixing, or sauce prep early. Save the final cooking, crisping, baking, or assembly step for closer to serving time so the texture is at its best.
Leftover Ideas
Leftovers can usually be turned into bowls, wraps, salad toppings, or quick lunches. Keep sauces or fresh toppings separate when possible so the texture stays better.
If you plan to use leftovers for lunch, portion them before refrigerating. Smaller containers cool faster, reheat more evenly, and make it easier to grab a realistic serving instead of repeatedly opening the same large dish.
For best results, label leftovers mentally by texture. Crisp foods need dry heat, creamy foods need gentle heat and a splash of liquid, and fresh toppings usually belong on the plate after reheating. That one habit keeps second-day food from feeling tired.
What to Serve With It
Serve with mashed potatoes, roasted carrots, green beans, or rice.
Storage and Reheating
Refrigerate up to 4 days and reheat covered with extra sauce.
Cool leftovers promptly and store them in shallow airtight containers. For general timing, the FoodSafety.gov cold storage chart is a useful reference.
Final Thoughts
This chicken is simple enough for a weekday but has the kind of glossy finish that looks planned.